WE HERE TO OFFER YOU WEB SITE/BLOG DESIGN AND TOOL/CODE FOR YOU BLOG/WEBSITE

How To Show HTML Codes in Blogger Posts

As many visitors ask how to embed html text in a way that it is displayed as it is in the published post and also their visitors can copy the content, so here's a way to do that quite easily:
The main problem you are facing when you are trying to display a HTML code in your blog post is that, when you enter a HTML code into the post editor("HTML" or "Compose" mode) and publish/update your post, web browser does not display your code correctly.
The reason for this to occur is that if you try to type the HTML as it is, the web browser always trying to display to result generated from that HTML code.
What you can do is:
change the "<" symbol with &lt; , and also the symbol ">" with &gt; , but as to do all this manually is quite difficult, so you can use this website tool for simply converting the html code into embeddable text:
Now you can copy generated code from above tool into your blog post.
Share:

Most Wanted Best Adsense Tips And Secrets

AdSense Tip 1: Find Best keywords for your content

Before serving ads on a web page, check its keyword density. You can find many free keyword analyzer tools in internet searching the word "free keyword analyzer".

AdSense Tip 2: Improve your keywords

Get keyword suggestions from Google AdWords Sandbox. Get new keywords that can help you improve your ad relevance.

AdSense Tip 3: Make content rich websites

This means that content-rich websites of a popular topic should attract a large amount of ads.

AdSense Tip 4: Write a new page/blog post every day

This is very important. The more content you have, the more visitors you will get. Put an Adsense unit on each and every content page of your site.

AdSense Tip 5: Choose the right AdSense format

The top three AdSense formats are for many webmasters:
336x280 large rectangle
300x250 medium rectangle
160x600 wide skyscraper
Another successful format is the 728x15 horizontal ad links, that can be placed under your navigation bar.
Use "Allowed site" feature of adsense to protect yourselves.If anyone put adsense codes in their websites you must not worried about it.

AdSense Tip 6: Adsense Color tips

When creating your Google AdSense ads it is recommended to use the color scheme and style of your website so that the ads blend in well.Google Ads with no background color and no borders will always perform better. Make the border color and background color same as your page background color.

AdSense Tip 7: Position tips

Place the AdSense ads in a prominent place around the top/left part of your page or under your headlines.
For short articles, CTR is best when ads are placed just above the content.
For long articles, CTR will improve if you place ads somewhere in middle of the content or just where the article ends.
Use Text Ads instead of Image Ads as users get more options and the payout is often higher.
Important:Don't places images next to Google ads as that will invite a permanent ban to your AdSense account.

AdSense Tip 8: Increase the number of ads, but not too much

If you have a lot of text on a page, use multiple AdSense units. You can use up to three AdSense units on a page, two AdSense search boxes and one unit of ad links.

AdSense Tip 9: Preview Google ads

You can find out what ads will be served by Google AdSense if you install Google AdSense Preview Tool, a very simple tool available only for Internet Explorer 6.0. Click to advertiser sites without generating invalid clicks, and easily add their URLs to your URL filter list. Because AdSense uses geo-targeting, Google serves different ads for other countries.

AdSense Tip 10: What not to do with adsense

Don't click on your own ads
Don't ask others to click on your Google ads
Don't manually change AdSense code
Don't place Google ads on sites that include prohibited content (e.g.: adult sites)
Don't employ cloaking, hidden text or farm links
Don't use AdSense ads on the same page with similar ads (e.g.: Yahoo Publisher Network)
And also don't refresh your site excessively.

AdSense Tip 11: Use section targeting

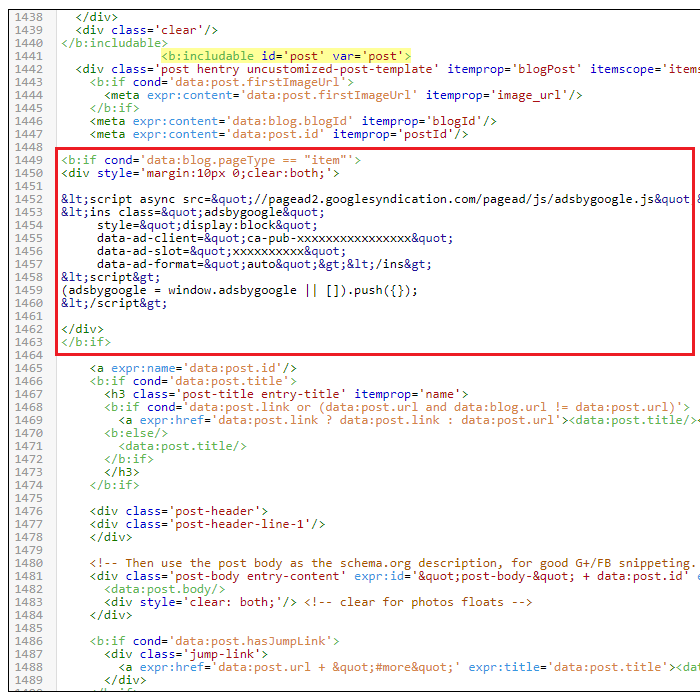
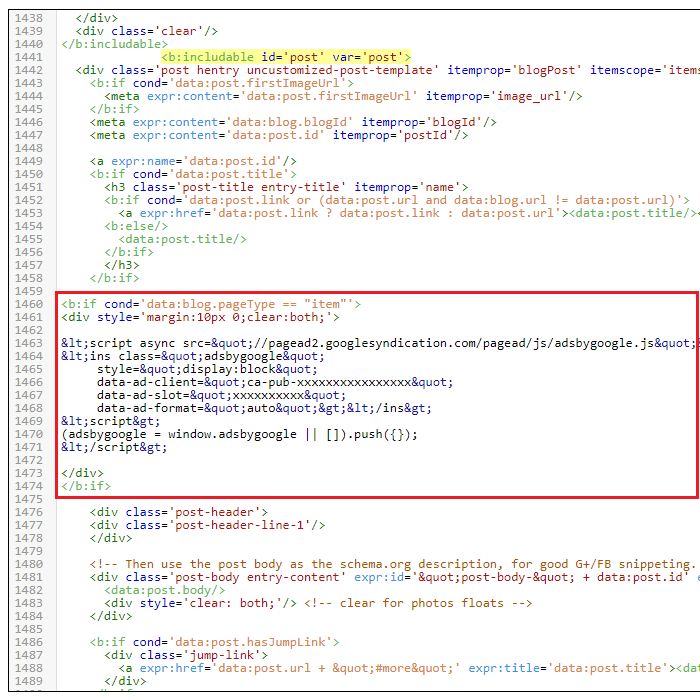
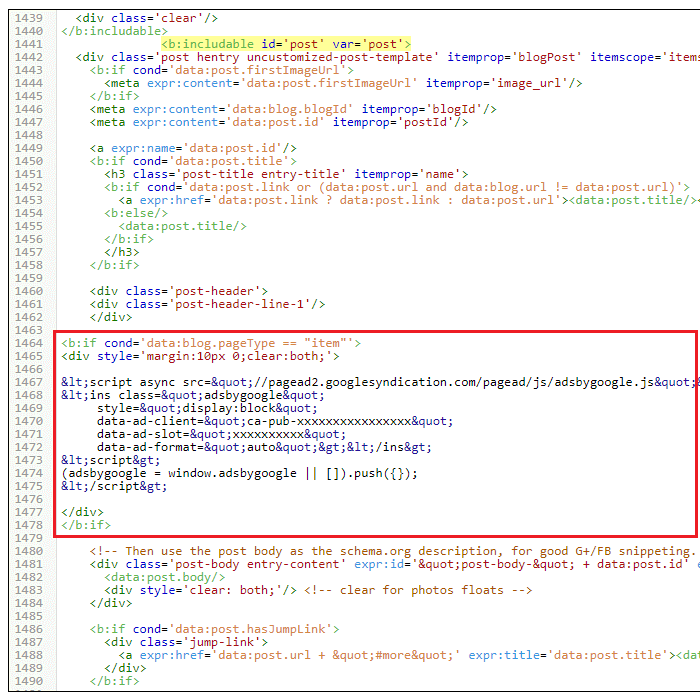
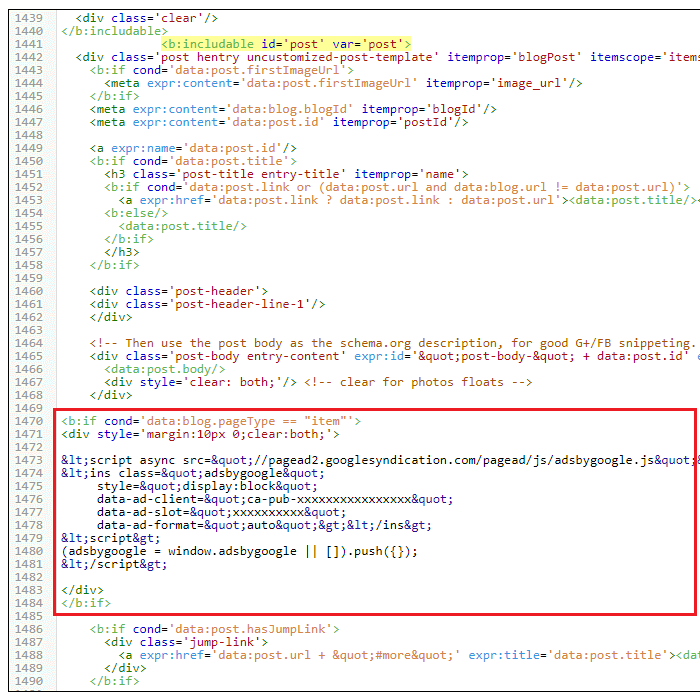
Use section targeting to emphasize some content in your page.To know more about section targeting read this article.

AdSense Tip 12: Your Google ads should be visible

Make sure your text ads are visible well to the surfers in all screen formats.

AdSense Tip 13: Use AdSense channels

You can categorize the content of your website into channels and then track your performance. This way you can experiment with different types of ads and see which is performing the best.

AdSense Tip 14: Follow Adsense Programme Polices

Strictly follow the rules mentioned in Adsense policies. You will always earn more monet from Adsense if you do it.

AdSense Tip 15:Never modify the Google Adsense HTML code

If have trouble embedding AdSense code in your Blogger template, read these articles.

AdSense Tip 16: Don't place ads in pop-up windows,error pages,empty pages

You must always remember to not to do it.

AdSense Tip 17: Don't start a "MFA"(made for adsense) web site

You will never make money out these Made for Adsense websites. Instead, write on topics what you are passionate about. Don't waste your money and time searching on high-paying adsense keywords lists.

AdSense Tip 18: Block Low Paying Adsense Ads

Block low paying advertisers with Filters.For more info read this article.

AdSense Tip 19: Adsense For Search

Always select the setting to open Google Adsense search box results in a new browser window, so you won't lose your visitors.
Share:

How to Display AdSense Ads only on Post Pages

Do you want to insert AdSense ads into your Blogger blog without showing them on the homepage? This tutorial explains how to display AdSense ads only on post pages of your blog. Following the steps given here you can insert ad code to the top or bottom of your post title or post content.
1.Generate parsed code of your AdSense code because we cannot put AdSense code directly into the Blogger xml. So parse it using AdParser.
Now your ad code will look like this:
HTML Parser
2.Go to "Edit HTML" of your blog. Find this line:
<b:includable id='post' var='post'>
Above line is the starting point of the code block which is responsible for displaying your posts. We need to add our ad code into this code block.
3.You should add your AdSense code like this:
<b:if cond='data:blog.pageType == "item"'>
<div style='margin:10px 0;clear:both;'>

ADD-YOUR-ADSENSE-CODE-HERE

</div>
</b:if>
Replace "ADD-YOUR-ADSENSE-CODE-HERE" with your parsed ad code.

How to Display Ads Above Post Title

To display advertisements above your post title, add your ad code like this:
AdSense Above Post Title Code

How to Display Ads Below Post Title

To display advertisements below your post title, add your ad code like this:
AdSense Below Post Title Code
Note: Adding advertisement directly below post titles is not recommended.

How to Display Ads Above Post Body

To display advertisements above your post's content, add your ad code like this:
AdSense Above Post Body Code

How to Display Ads Above Post Body

To display advertisements below your post's content, add your ad code like this:
AdSense Below Post Body Code
Note: Above codes can be slightly different according to the template you are using.
Share:

Facebook Popup (Like Box Widget) For Your Website/blog

Add this enticing widget to your site and a facebook like box will pop up with the lightbox effect when a user visits your page.

  1. Login into your blogger blog 
  2. Go to Layout 
  3. Click on Add Gadget
  4.  Select  HTML/JavaScript Add 
 5. Then Save


 <script src='http://ajax.googleapis.com/ajax/libs/jquery/1.7.2/jquery.min.js' type='text/javascript'></script>
<style type="text/css">
#fbox-background{display:none;background:rgba(0,0,0,0.8);width:100%;height:100%;position:fixed;top:0;left:0;z-index:99999}#fbox-close{width:100%;height:100%}#fbox-display{background:#eaeaea;border:5px
 solid 
#828282;width:340px;height:230px;position:absolute;top:32%;left:37%;-webkit-border-radius:5px;-moz-border-radius:5px;border-radius:5px}#fbox-button{float:right;cursor:pointer;position:absolute;right:0;top:0}#fbox-button:before{content:"CLOSE";padding:5px
 
8px;background:#828282;color:#eaeaea;font-weight:700;font-size:10px;font-family:Tahoma}#fbox-link,#fbox-link
 a.visited,#fbox-link a,#fbox-link 
a:hover{color:#aaa;font-size:9px;text-decoration:none;text-align:center;padding:5px}
</style>
<script type='text/javascript'>
//<![CDATA[
jQuery.cookie=function(a,b,c){if(arguments.length>1&&"[object
 Object]"!==String(b)){if(c=jQuery.extend({},c),null!==b&&void 
0!==b||(c.expires=-1),"number"==typeof c.expires){var 
d=c.expires,e=c.expires=new Date;e.setDate(e.getDate()+d)}return 
b=String(b),document.cookie=[encodeURIComponent(a),"=",c.raw?b:encodeURIComponent(b),c.expires?";
 expires="+c.expires.toUTCString():"",c.path?"; 
path="+c.path:"",c.domain?"; domain="+c.domain:"",c.secure?"; 
secure":""].join("")}c=b||{};var f,g=c.raw?function(a){return 
a}:decodeURIComponent;return(f=new RegExp("(?:^|; 
)"+encodeURIComponent(a)+"=([^;]*)").exec(document.cookie))?g(f[1]):null};
//]]>
</script>
<script type='text/javascript'>
jQuery(document).ready(function($){
if($.cookie('popup_facebook_box') != 'yes'){
$('#fbox-background').delay(5000).fadeIn('medium');
$('#fbox-button, #fbox-close').click(function(){
$('#fbox-background').stop().fadeOut('medium');
});
}
$.cookie('popup_facebook_box', 'yes', { path: '/', expires: 7 });
});
</script>
<div id='fbox-background'>
<div id='fbox-close'>
</div>
<div id='fbox-display'>
<div id='fbox-button'>
</div>
<iframe allowtransparency='true' frameborder='0' scrolling='no' src='//www.facebook.com/plugins/likebox.php?
href=https://www.facebook.com/KS-Webblog-TOOLS-548388695500504&width=339&height=255&colorscheme=light&show_faces=true&show_border=false&stream=false&header=false'
style='border: none; overflow: hidden; background: #fff; width: 339px; height: 200px;'></iframe>
<div id="fbox-link">Powered by <a style="padding-left: 0px;" href="http://KS WEB/BLOG TOOLS.blogspot.com/2014/12/facebook-popup-like-box-blogger-widget.html" rel="nofollow">KS WEB/BLOG TOOLS</a></div>
</div>
</div>

CONFIGURE THE CODE

1.LOOK FOR  AND REPLACE IT WITH YOUR OWN FACEBOOK PAGE LINK
 https://www.facebook.com/KS-Webblog-TOOLS-548388695500504

 2.Change the 10 Second Time Delay
By default the widget pops up 10 seconds after the page finishes loading.  Search for the code below and change the number 20000 to a greater or lesser number.
1 second = 1000.  10 seconds = 10000. 60 seconds = 60000.

3. .delay(10000) Popup every time the page loads By default, the like box widget only shows up the first time the user visits your page.  If you would like the facebook box to popup every time the page loads, then remove this line of code:

4.
 $.cookie('popup_user_login', 'yes', { path: '/', expires: 7 });


Change the 7 to any number of days you want it to show up 
(EXAMPLE)
1 for every day 

To make it show every time the page reload remove the link 

AND SAVE

Share:

How To Upload/Install a Blogger Template


This article have explained how to upload a blogger template into your blog. If you faced to an unexpected error when trying to install a template contact me, I will upload that template into your blog. Also if you have problems like undeletable widgets, layout not displaying correctly,.. contact me for fast support.
First download your new blogger template to your computer. If the template is contained in a zip file, ensure you have extracted the XML template.

1. Login to your Blogger Account.

2. Click on your blog name

3. Click on "Template".

Click on Template


4. Click on "Backup / Restore" button.


Click on Backup Restore button


"Backup / Restore" window will appear.


5. Browse your template file (XML file) and click open.

6. Finally click on "Upload" button.


You are done


Share:

How To Backup Your Blogger Template


1.Log in to your Blogger Dashboard.


2.Click on "Theme".


3.Click on "Backup / Restore".


4.Click on "Download THEME".


Share:

How To Remove Auto Read More Feature

In this tutorial I am going to explain how to remove "Auto Read More feature with Thumbnail".This method will not work with every blogger template.But this tutorial will help you to remove auto read more feature from many template you can download from here.
Before doing this change, I highly recommend to backup your blogger template first.


Login to your Blogger Dashboard → Design → Edit HTML.
Now find below code in your template.(there can be some changes in the code according to your template)


<p><script type='text/javascript'>
summary_noimg = 800;
summary_img = 650;
img_thumb_height = 150;
img_thumb_width = 200;
</script>
<script type='text/javascript'>
//<![CDATA[

function removeHtmlTag(strx,chop){
if(strx.indexOf("<")!=-1)
{
var s = strx.split("<");
for(var i=0;i<s.length;i++){
if(s[i].indexOf(">")!=-1){
 s[i] = s[i].substring(s[i].indexOf(">")+1,s[i].length);
}
}
strx =  s.join("");
}
chop = (chop < strx.length-1) ? chop : strx.length-2;
while(strx.charAt(chop-1)!=' ' && strx.indexOf(' ',chop)!=-1) chop++;
strx = strx.substring(0,chop-1);
return strx+'...';
}

function createSummaryAndThumb(pID){
var div = document.getElementById(pID);
var imgtag = "";
var img = div.getElementsByTagName("img");
var summ = summary_noimg;
if(img.length>=1) {
imgtag = '<span style="float:left; padding:0px 10px 5px 0px;"><img src="'+img[0].src+'" width="'+img_thumb_width+'px" height="'+img_thumb_height+'px"/></span>';
summ = summary_img;
}

var summary = imgtag + '<div>' + removeHtmlTag(div.innerHTML,summ) + '</div>';
div.innerHTML = summary;
}

//]]>
</script>
<b:if cond='data:blog.pageType != &quot;static_page&quot;'>
<b:if cond='data:blog.pageType != &quot;item&quot;'>
<div expr:id='&quot;summary&quot; + data:post.id'><data:post.body/></div>
<script type='text/javascript'>createSummaryAndThumb(&quot;summary<data:post.id/>&quot;);</script>
<div><a expr:href='data:post.url'>Read more &#187;</a></div>
</b:if>
</b:if>
<b:if cond='data:blog.pageType == &quot;item&quot;'><data:post.body/></b:if>

<b:if cond='data:blog.pageType == &quot;static_page&quot;'><data:post.body/></b:if></p>

Now replace it with below code:


<p><data:post.body/></p>

Save your template.
Share:


Popular Posts

Powered by Blogger.

Labels

Recent Posts

Pages

Theme Support

Need our help to upload or customize this blogger template? Contact me with details about the theme customization you need.